This part of the series covers mainly two topics – the camera and (combinatorial) graphs.
Besides this, it also includes some useful concepts for more advanced animations.
save and restore
Each Manim object (MObject
) contains the save_state
function that allows saving the current state of the object, which it can later go back to using the restore
function (possibly using the animate syntax).
This makes the code, in certain situations, much more compact and readable.
frommanimimport*classGraphExample(Scene):defconstruct(self):# the graph class expects a list of vertices and edgesvertices=[1,2,3,4,5,6,7,8,9,10,11]edges=[(1,2),(2,3),(3,4),(2,4),(2,5),(6,5),(1,7),(5,7),(2,8),(1,9),(10,8),(5,11),]# we're using the layout_config's seed parameter to deterministically set the# vertex positions (it is otherwise set randomly)g=Graph(vertices,edges,layout_config={"seed":0}).scale(1.6)self.play(Write(g))# the graph contains updaters that align edges with their verticesself.play(g.vertices[6].animate.shift((LEFT+DOWN)*0.5))self.play(g.animate.shift(LEFT*3))# the graphs can also contain labels and be organized into specific layouts# (see the Graph class documentation for the list of all possible layouts)h=Graph(vertices,edges,labels=True,layout="circular").shift(RIGHT*3)self.play(Write(h))# color the vertex 5 and all of its neighboursv=5self.play(Flash(g.vertices[v],color=RED,flash_radius=0.5),g.vertices[v].animate.set_color(RED),*[g.edges[e].animate.set_color(RED)foreing.edgesifvine],)
As you can see from the code, the Graph
expects a list of vertices and edges as the input.
To access them, we will use the graph.vertices and graph.edges dictionaries – just be careful that edges of type (u,v) can’t be accessed by using (v,u) (something quite unintuitive for undirected graphs).
The default algorithm for vertex positioning is Fruchterman-Reingold and works in a simple way – vertices have a repulsing force and edges have an attracting one.
Besides the seed parameter, the algorithm has a number of other parameters for adjusting its behavior, which you can read about in the link above.
Custom vertices and edges
Note that vertices and edges need not be circles and segments – we can use custom Manim objects and functions for creating more exotic graphs.
frommanimimport*fromrandomimportuniform,randint,seedclassStarrySkyExample(Scene):defconstruct(self):seed(0xDEADBEEF)# the graph class expects a list of vertices and edgesvertices=[1,2,3,4,5,6,7,8,9,10,11]edges=[(1,2),(2,3),(3,4),(2,4),(2,5),(6,5),(1,7),(5,7),(2,8),(1,9),(10,8),(5,11),]defRandomStar():"""Create a pretty random star."""returnStar(randint(5,7),fill_opacity=1,outer_radius=0.1,color=WHITE).rotate(uniform(0,2*PI))defRandomSkyLine(u,v,z_index=None):"""Create a pretty random sky line. The z_index is necessary, since it is
passed by the graph constructor to edges so they're behind vertices."""returnDashedLine(u,v,dash_length=uniform(0.03,0.07),z_index=z_index)# custom graph with star vertices and dashed line edgesg=(Graph(vertices,edges,layout_config={"seed":0},vertex_type=RandomStar,edge_type=RandomSkyLine,).scale(2).rotate(-PI/2))self.play(Write(g))self.play(FadeOut(g))
As the code suggests, the current implementation expects both vertex_type and edge_type to be functions returning a MObject
. Besides this, the edge_type function must have an optional z_index parameter, since the graph implementation sets it to a negative number to push the edges behind the vertices. Additionally, the edges must have a put_start_and_end_on function (which DashedLine
does), since this is what edge updaters call when vertices move.
Random graphs
If we don’t want to create random graphs manually, we can use the popular networkx library, which contains a number of useful graph generators and graph-related functions.
frommanimimport*fromrandomimport*importnetworkxasnxclassGraphGenerationExample(Scene):defconstruct(self):seed(0xDEADBEEF)n=12# number of verticesp=3/n# probability that there is an edge between a pair# generate until our graph is not connected (so it looks nicer)graph=NonewhilegraphisNoneornotnx.is_connected(graph):graph=nx.generators.random_graphs.gnp_random_graph(n,p)g=(Graph.from_networkx(graph,layout_config={"seed":0}).scale(2.2).rotate(-PI/2))self.play(Write(g))
Camera
In Manim, each camera scene contains a camera object (implemented via the Camera
).
So far, it wasn’t very useful, because we’ve implemented all object transformations by changing the objects themselves.
In certain cases, however, it is much more convenient to just move/zoom the camera to achieve the same result.
This is not as simple as it seems, because the default Scene
class isn’t equipped to deal with a moving camera.
That’s why we’ll use the MovingCameraScene
, which contains a frame object that we can animate.
frommanimimport*classMovingCameraExample(MovingCameraScene):defconstruct(self):square=Square()self.play(Write(square))self.camera.frame.save_state()# zoom for the square to fill in the entire view (+ a bit of space)self.play(self.camera.frame.animate.set_height(square.height*1.5))circle=Circle().next_to(square,LEFT)# move the camera to the new objectself.play(AnimationGroup(self.camera.frame.animate.move_to(circle),Write(circle),lag_ratio=0.5,))self.wait(0.5)# zoom out (increasing frame size covers more of the screen)self.play(self.camera.frame.animate.scale(1.3))triangle=Triangle().next_to(square,RIGHT)# move the camera againself.play(AnimationGroup(self.camera.frame.animate.move_to(triangle),Write(triangle),lag_ratio=0.5,))self.wait(0.5)self.play(self.camera.frame.animate.restore())
As the example suggests, the self.camera.frame object behaves just like all of the animated objects we’ve seen – we can set its height, scale it, move it, etc.
This also means that we can use updaters exactly how one would expect.
frommanimimport*fromrandomimport*classMovingCameraUpdaterExample(MovingCameraScene):defconstruct(self):seed(0xDEADBEEF)n=11**2circles=VGroup(*[Circle(radius=0.1).scale(uniform(0.5,2)).shift(UP*uniform(-3,3)+RIGHT*uniform(-5,5)).set_color(WHITE)for_inrange(n)])# the circle we'll followtarget=circles[n//2]deffollow_camera(camera):"""An updater that makes sure the camera is on top of the target."""camera.move_to(target.get_center())self.camera.frame.add_updater(follow_camera)# TRIPLE CAUTION!# updaters only work on things added to the scene# since self.camera.frame is, by default, not on the scene, we need to add itself.add(self.camera.frame)self.play(FadeIn(circles))scale_factor=0.7defarrange_and_zoom(rows,color):"""Arrange the circles in a grid, zooming the camera in the process."""self.play(circles.animate.arrange_in_grid(rows=rows).set_color(color),self.camera.frame.animate.scale(scale_factor),run_time=1.5,)arrange_and_zoom(7,RED)arrange_and_zoom(5,GREEN)arrange_and_zoom(14,BLUE)
As the code mentions, it is very important to pay attention to whether the updated object has been added to the scene.
In this case, the updater hasn’t been animated yet (which implicitly adds it to the scene), meaning that we had to add it manually.
Besides moving and zooming, we can also do things like changing the color of the background.
For fine-tuning animations, it is sometimes desirable to change the functions that time them.
We’ve already seen rate functions in action; here is how to set them explicitly.
frommanimimport*# shamelessly stolen (modulo minor changes) from the Manim documentation# https://docs.manim.community/en/stable/reference/manim.utils.rate_functions.htmlclassRateFunctionsExample(Scene):defconstruct(self):line1=Line(3*LEFT,RIGHT).set_color(RED)line2=Line(3*LEFT,RIGHT).set_color(GREEN)line3=Line(3*LEFT,RIGHT).set_color(BLUE)line4=Line(3*LEFT,RIGHT).set_color(ORANGE)lines=(VGroup(line1,line2,line3,line4).arrange(DOWN,buff=0.8).move_to(LEFT*2))dot1=Dot().move_to(line1.get_start())dot2=Dot().move_to(line2.get_start())dot3=Dot().move_to(line3.get_start())dot4=Dot().move_to(line4.get_start())dots=VGroup(dot1,dot2,dot3,dot4)# care for writing _ in latex -- needs to be escapedlabel1=Tex(r"smooth (default)").next_to(line1,RIGHT,buff=0.5)label2=Tex(r"linear").next_to(line2,RIGHT,buff=0.5)label3=Tex(r"there\_and\_back").next_to(line3,RIGHT,buff=0.5)label4=Tex(r"rush\_into").next_to(line4,RIGHT,buff=0.5)labels=VGroup(label1,label2,label3,label4)self.play(Write(lines),FadeIn(dots),FadeIn(labels))# usage in animate syntax (animating moving dots)self.play(dot1.animate(rate_func=smooth).shift(RIGHT*4),dot2.animate(rate_func=linear).shift(RIGHT*4),dot3.animate(rate_func=there_and_back).shift(RIGHT*4),dot4.animate(rate_func=rush_into).shift(RIGHT*4),run_time=3,)self.play(FadeOut(lines),FadeOut(dots))# usage in normal animations (writing lines)self.play(Write(line1,rate_func=smooth),Write(line2,rate_func=linear),Write(line3,rate_func=there_and_back),Write(line4,rate_func=rush_into),run_time=3,)
Below is the (almost) complete list of curves that are frequently used in animations.
There also exists a wonderful website which contains a number of these functions, including an interactive visualisation of their progress, if you want to experiment with them outside of Manim.
Tasks
Graph algorithm
Create an animation of DFS (or some other neat graph algorithm).
Note that the solution to this task might suffer from a bug in Manim’s graph class implementation in the ordering of vertices and edges in AnimationGroup
(at least from what I can gather, I haven’t been able to debug what exactly the issue is), which can be solved by manually setting a higher z_index for the graph’s vertices.
1
2
3
# quickfix for a bug in AnimationGroup's handling of z_indexforvingraph.vertices:graph.vertices[v].set_z_index(1)
frommanimimport*fromrandomimport*importnetworkxasnxclassGraphAlgorithm(Scene):defconstruct(self):seed(0xDEADBEEF)n=14p=3/nVISITED_COLOR=GREENNEIGHBOUR_COLOR=BLUEgraph=NonewhilegraphisNoneornotnx.is_connected(graph):graph=nx.generators.random_graphs.gnp_random_graph(n,p)g=(Graph(graph.nodes,graph.edges,layout_config={"seed":0}).scale(2.7).rotate(PI/12))# quickfix for a bug in AnimationGroup's handling of z_indexforving.vertices:g.vertices[v].set_z_index(1)explored=set()defdfs(v,position_object):"""Recursive DFS which moves the position_object."""neighbours=list(graph.neighbors(v))forwinneighbours:ifwinexplored:continueedge=(v,w)if(v,w)ing.edgeselse(w,v)unexplored_neighbours=[wforwinneighboursifwnotinexplored]unexplored_neighbour_edges=[(a,b)fora,bing.edgesif(a==vandbinunexplored_neighbours)or(b==vandainunexplored_neighbours)]# while there exist unexplored neighbours, exploreiflen(unexplored_neighbours)!=0:self.play(*[g.vertices[q].animate.set_color(NEIGHBOUR_COLOR)forqinunexplored_neighbours],*[g.edges[e].animate.set_color(NEIGHBOUR_COLOR)foreinunexplored_neighbour_edges],)explored.add(w)# animation of transitioning to neighbouring vertex# has two parts - first initialize the move and then change color (+ flash)self.play(AnimationGroup(position_object.animate.move_to(g.vertices[w]),AnimationGroup(Flash(g.vertices[w],color=VISITED_COLOR,flash_radius=0.3),g.edges[edge].animate.set_color(VISITED_COLOR),g.vertices[w].animate.set_color(VISITED_COLOR),*[g.vertices[q].animate.set_color(WHITE)forqinunexplored_neighboursifq!=w],*[g.edges[(a,b)].animate.set_color(WHITE)for(a,b)inunexplored_neighbour_edgesif(a,b)!=edge],),lag_ratio=0.45,))dfs(w,position_object)self.play(position_object.animate.move_to(g.vertices[v]))self.play(Write(g))start_vertex=0position_object=(Circle(fill_color=VISITED_COLOR,fill_opacity=1,stroke_color=VISITED_COLOR).move_to(g.vertices[start_vertex]).scale(0.15))self.play(Flash(g.vertices[start_vertex],color=VISITED_COLOR,flash_radius=0.3),g.vertices[start_vertex].animate.set_color(VISITED_COLOR),)self.add(position_object)# run DFSexplored.add(start_vertex)dfs(start_vertex,position_object)self.remove(position_object)self.play(Unwrite(g))
Fibonacci sequence
Create animation of the Fibonacci sequence (or some other similar sequence like Pell’s numbers or Lucas’ numbers).
Updaters from the previous part will be very handy.
Additionally, the TracedPath
class can be used to create the path traced by the dot traveling around the spiral.
The animation of the dot travel can be implemented via the Rotate
animation, which can be used to rotate one object around another.
frommanimimport*classTracePathExample(Scene):defconstruct(self):dot=Dot().shift(LEFT)self.play(Write(dot))# TracedPath accepts a function that returns the position of the object to tracepath=TracedPath(dot.get_center)# we mustn't forget to add the path to the scene for it to get updated!self.add(path)self.play(Rotate(dot,about_point=ORIGIN))self.play(dot.animate.shift(UP))self.play(dot.animate.shift(LEFT*2))self.play(dot.animate.shift(DOWN))path.clear_updaters()self.play(dot.animate.shift(RIGHT*2))
There is, however, a slight catch: using TracedPath
runs into a well-known Manim bug with caching – that’s why we need to use the --disable_caching flag which fixes this bug by not caching the animations.
frommanimimport*fromrandomimport*classFibonacciSequence(MovingCameraScene):defcreate_square(self,size):"""Create a square of the given size."""returnVGroup(Square(side_length=size),Tex(f"${size}^2$").scale(size))defget_camera_centering_animation(self,squares):"""Center (and scale) the camera at the given square."""h=squares.height*1.5returnself.camera.frame.animate.set_height(h).move_to(squares)defconstruct(self):squares=VGroup(self.create_square(1))self.play(Write(squares[0]),self.get_camera_centering_animation(squares[0]))self.camera.frame.save_state()n=7# create the squaresa=1b=1directions=[RIGHT,UP,LEFT,DOWN]foriinrange(n):b=b+aa=b-adirection=directions[i%4]new_square=self.create_square(a).next_to(squares,direction,buff=0)squares.add(new_square)self.play(FadeIn(new_square,shift=direction*a/3),self.get_camera_centering_animation(squares),)dot=Dot().move_to(squares[0].get_corner(LEFT+UP)).scale(0.5)path=TracedPath(dot.get_center)self.wait(1)# start the spiralself.play(squares.animate.set_color(DARK_GRAY),AnimationGroup(self.camera.frame.animate.restore().move_to(dot),Write(dot),lag_ratio=0.5,),)# keep a copy of the dot at the origincenter_dot=dot.copy()self.add(center_dot)# for scaling the dotstarting_frame_height=self.camera.frame.heightdefupdate_camera_position(camera):"""Updater k pozicování kamery nad tečkou."""camera.move_to(dot.get_center())defupdate_spiral(path):"""Scale the thickness of the stroke with the zoom of the camera."""path.set_stroke_width(self.camera.frame.height/1.5)defupdate_dot(dot):"""Scale the size of the dot with the zoom of the camera."""dot.set_height(center_dot.height*(self.camera.frame.height/starting_frame_height))# don't forget to add the path to the scene so it gets animatedself.add(path)path.add_updater(update_spiral)self.camera.frame.add_updater(update_camera_position)dot.add_updater(update_dot)a=0b=1foriinrange(n+1):# the directions are defined in a way where neighbouring directions correspond# to points around which we want to rotatedirection=directions[i%4]+directions[(i+1)%4]b=b+aa=b-a# we're zooming by about the golden ratio each rotation (a little less for# the animation to look smoother)phi=(1+5**(1/2))/2zoom_coefficient=phi*0.9self.play(Rotate(dot,about_point=squares[i].get_corner(direction),angle=PI/2,),self.camera.frame.animate.scale(zoom_coefficient),rate_func=linear,)# cleanupself.camera.frame.clear_updaters()path.clear_updaters()dot.clear_updaters()self.play(self.get_camera_centering_animation(squares))self.wait(1)self.play(FadeOut(squares),FadeOut(dot),AnimationGroup(Unwrite(path,run_time=2),AnimationGroup(Flash(center_dot,color=WHITE),FadeOut(center_dot)),lag_ratio=0.9,),)
Langton’s ant
Create an animation of Langton’s ant (or one of its color variants).
In each step, the ant moves in the following manner:
if it’s on a black space, turns right; else turns left
inverts the color of the space it’s standing on
moves forward
To create the ant object, you can use the SVGMobject
class to render an SVG image (this one, for example, which the author’s solution uses).
 1
 2
 3
 4
 5
 6
 7
 8
 9
10
11
12
13
14
frommanimimport*classSVGExample(Scene):defconstruct(self):image=SVGMobject("ant.svg")self.play(Write(image))self.play(image.animate.set_color(RED).scale(1.75))self.play(Rotate(image,TAU))# tau = 2 piself.play(FadeOut(image))
There is one trap in this task, which is using updaters on the ant to track it while moving.
This won’t move due to how a center of an object is calculated – by default, it is simply the center of the bounding rectangle of the object, which fails for shapes like the ant.
frommanimimport*fromrandomimport*classAnt:deltas=[(-1,0),(0,-1),(1,0),(0,1)]def__init__(self,position):self.position=positionself.orientation=0def__get_orientation_delta(self):"""By how much should the ant move in the current orientation."""returnself.deltas[self.orientation]def__rotate_by_delta(self,delta):"""Turn the ant in a multiple of 90 degrees."""self.orientation=(self.orientation+delta)%len(self.deltas)defrotate_left(self):"""Turn the ant left."""self.__rotate_by_delta(-1)defrotate_right(self):"""Turn the ant right."""self.__rotate_by_delta(1)defmove_forward(self):"""Move the ant forward."""dx,dy=self.__get_orientation_delta()self.position[0]+=dxself.position[1]+=dydefupdate(self,states):"""Move and turn the ant, updating its state."""x,y=self.positionifstates[y][x]:self.rotate_right()else:self.rotate_left()states[y][x]=notstates[y][x]self.move_forward()classLangtonAnt(MovingCameraScene):defconstruct(self):n=15state=[[Falsefor_inrange(n)]for_inrange(n)]squares=[[Square()for_inrange(n)]for_inrange(n)]squares_vgroup=VGroup(*[*sum(squares,[])]).arrange_in_grid(columns=n,buff=0)ant=Ant([n//2,n//2])ant_object=(SVGMobject("ant.svg").set_height(squares_vgroup[0].height*0.7).rotate(PI/2))self.play(FadeIn(squares_vgroup),Write(ant_object))self.wait(1)step_count=100slow_start_iterations=5slow_end_iterations=3slow_run_time=1fast_run_time=0.07foriinrange(step_count):x,y=ant.positionnew_color=state[y][x]rect=squares[y][x]running_time=(fast_run_timeifslow_start_iterations<i<step_count-slow_end_iterationselseslow_run_time)self.play(Rotate(ant_object,PI/2*(1ifnew_colorelse-1)),run_time=running_time,)ant.update(state)nx,ny=ant.positionself.play(rect.animate.set_fill(BLACKifnew_colorelseWHITE,1),ant_object.animate.move_to(squares[ny][nx]),self.camera.frame.animate.move_to(squares[ny][nx]),run_time=running_time,)self.wait(1)# determine the currently filled squares to move to themwhite_squares=VGroup()foriinrange(n):forjinrange(n):ifstate[i][j]:white_squares.add(squares[i][j])self.play(self.camera.frame.animate.move_to(white_squares).set_height(white_squares.height*1.2))self.play(FadeOut(squares_vgroup),FadeOut(ant_object))

 Camera and Graphs
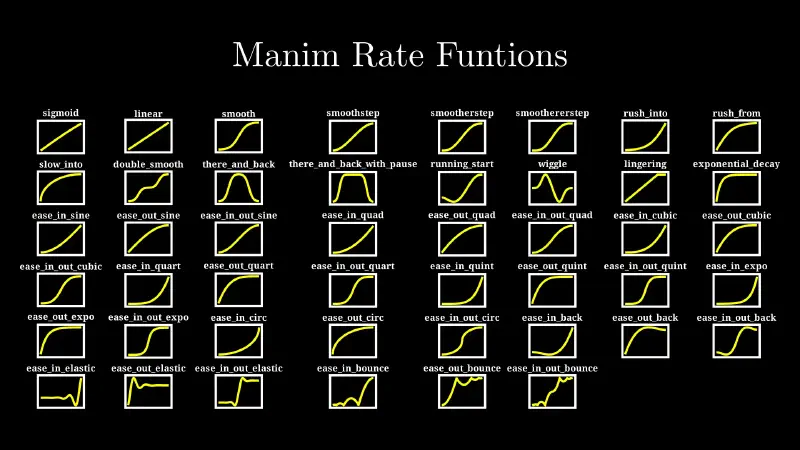